Ordering several print products at once should not mean repeating the entire setup process from scratch for every item. A multiple product order lets you add different products to the same cart, review each item, adjust quantities, and make image edits before sending the order to production.
Whether you are ordering several pieces of artwork for one project, or simply want to save time while building a larger order, understanding the multi-product ordering process can make the workflow much easier.
In this guide, we will walk through how to add multiple products to a Lumaprints order, and how to edit or remove items from your cart.
You can also watch the original Multi-product Ordering and Editing – Lumaprints Learning Series 14 webinar for a visual walkthrough of the process.
If you prefer reading, follow the step-by-step guide below and jump directly to the part of the ordering process you need.
Before You Add Multiple Products
Before building a multi-product order, it helps to have your artwork and product details ready.
For each item, consider:
- The artwork or image file you want to print
- The print product
- Print dimensions
- Hanging hardware or other available finishing options
- Quantity needed
Having these details ready can make adding several products much faster.
If this is your first time placing an order, you may want to review our Processing an Order with Lumaprints guide first. It walks through the basic ordering process before you begin adding several items to one cart.
It is also a good idea to use your highest-quality artwork files. When ordering different sizes from the same image, take a moment to check how the composition fits each selected print size before adding the item to your cart.
How to Add Multiple Products to an Order
After setting up your first product, you do not need to begin an entirely separate order for every additional item.
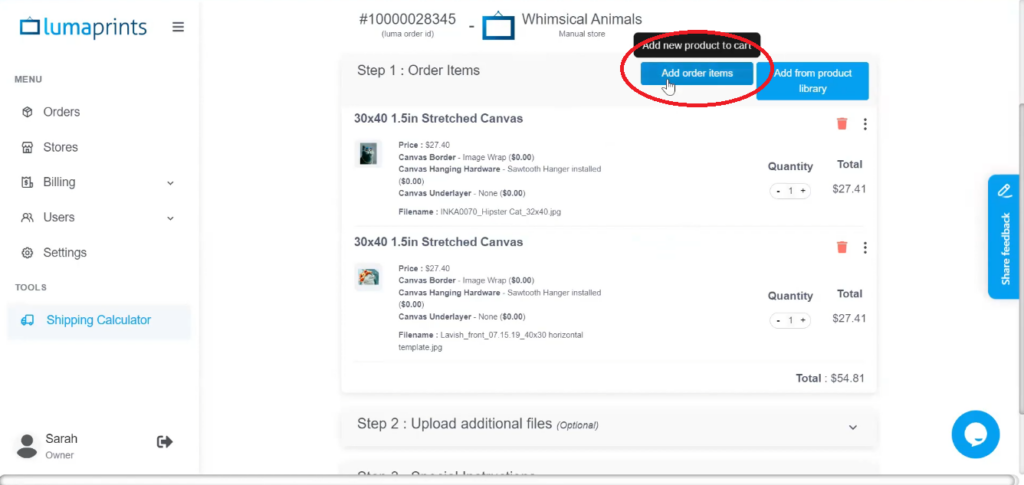
Go to your cart and select Add Order Items.
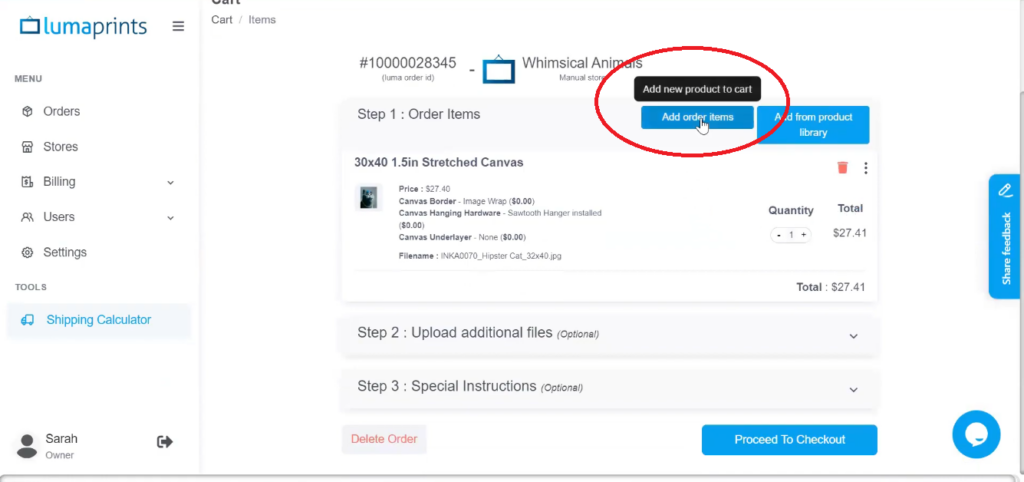
This takes you back into the product setup process, where you can choose another product and configure it for the same order.
Upload or select the artwork you want to use, then choose the product, size, and other available options.
Take a moment to review everything before continuing, especially if you are adding several products with similar artwork but different sizes or finishes.
When the product is ready, select Add to Cart.
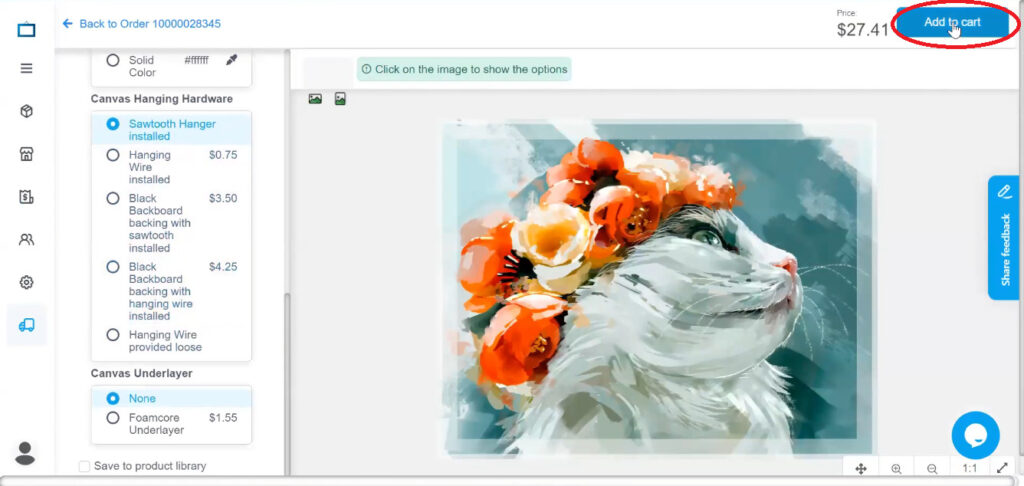
The additional item will appear alongside the other products already in your cart.
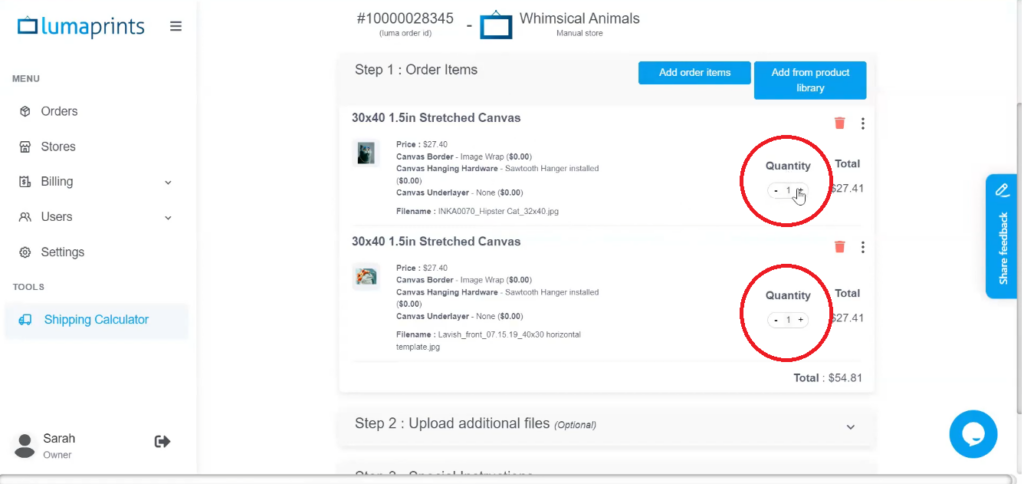
If you need more than one copy of the same configured item, use the quantity controls beside the product to increase or decrease the number ordered.
Repeat the process until all the products you need are in your cart.
Tips for Building a Multi-Product Order
When several products are being added at once, it becomes easier to accidentally assign the wrong image, size, or product option.
A few simple checks can help prevent that.
Review Each Item as You Add It
Do not wait until the final checkout screen to inspect the entire order.
After adding each product, confirm:
- The correct artwork was uploaded
- The correct product was selected
- The size matches your intended artwork
- Orientation looks right
- Canvas border settings are correct
- Quantity is correct
Checking each item as you go makes troubleshooting much easier than reviewing a large cart only at the end.
Keep Artwork Files Clearly Named
If you work with several similar designs, descriptive filenames can save time.
Instead of filenames such as:
image1.jpg
or:
final2.jpg
use names that help you recognize the artwork quickly, such as:
mountain-landscape-16×20.jpg
or:
city-photography-black-white.jpg
Clear filenames become even more useful as your image library and product catalog grow.
Double-Check Similar Variations
If you are ordering the same design in several sizes, do not assume every size will use exactly the same crop.
A composition that works perfectly at one aspect ratio may need adjustment at another.
Preview each item before adding it to the order, especially when important subjects, text, signatures, or design elements sit near the edge of the image.
Adding Products Using Multiple Browser Tabs
If you are setting up several products and prefer to work on more than one at a time, you can use separate browser tabs as an optional workflow.
First, select Add Order Items.
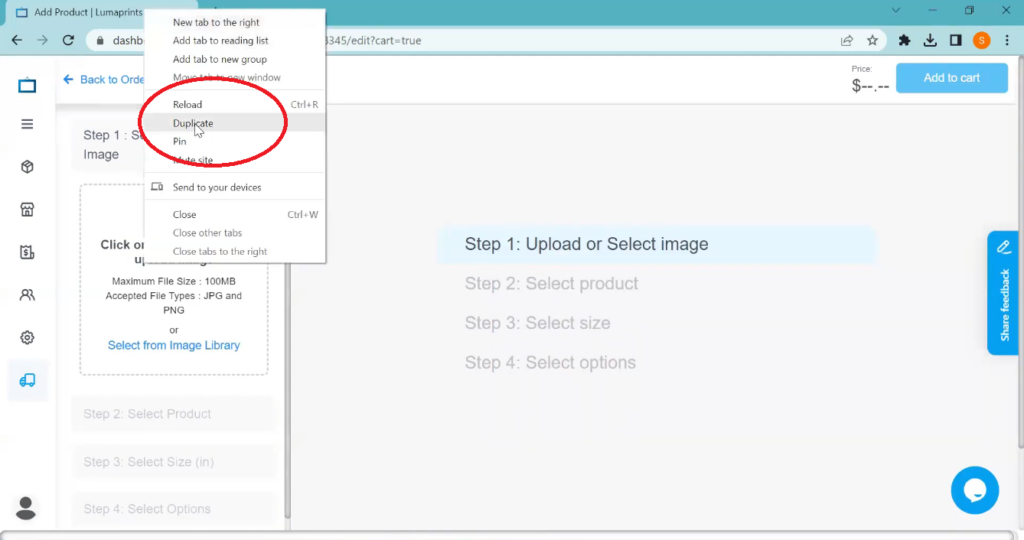
Once the product setup page opens, right-click the browser tab and choose Duplicate.
You can create a separate tab for each product you plan to configure.
Set up the product in each tab and select Add to Cart when it is ready.
This method can be useful when you already know which products you need and want to move between several setups without repeatedly navigating back and forth between the card and the ordering page.
Keep track of which tab belongs to which artwork. When several similar products are open at once, it can be easy to mix up images or dimensions.
How to Remove a Product From Your Cart
If you accidentally add the wrong item or decide you no longer need a product, you can remove it before submitting the order.
Open your cart and locate the product you want to delete.
Select the trash icon beside the item.
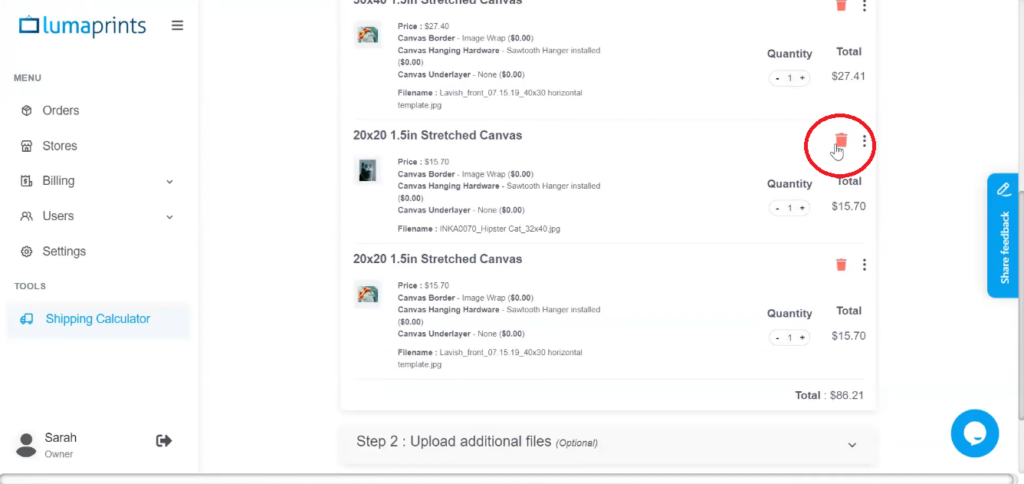
Before deleting anything from a larger order, check the artwork, size, and quantity so you do not accidentally remove a similar product that you intended to keep.
How to Edit a Product From Your Cart
You do not necessarily need to remove and rebuild an item if you notice something that needs to be changed.
Locate the product in your cart, select the three-dot menu beside the item, and choose Edit Item.
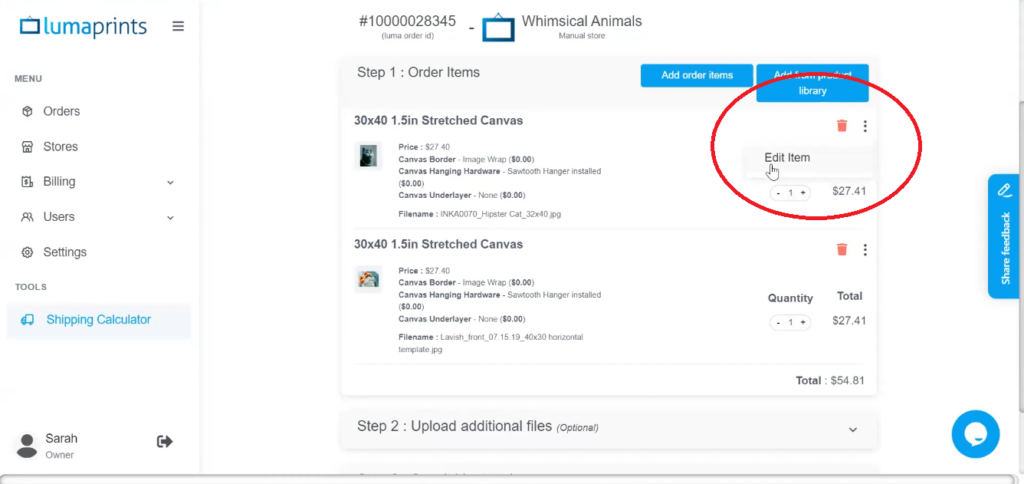
You can then review the product configuration and make the necessary adjustments before returning it to the cart.
Editing from the cart is useful when you need to correct:
- Image placement
- Orientation
- Print size
- Canvas border option
- Another available product option
Always review the selections for the updated item once more before proceeding to checkout.
Using the Lumaprints Image Editing Tools
Lumaprints includes image editing tools that help you position and preview your artwork before printing.
These controls are particularly useful when an image needs minor positioning adjustments to fit the selected print size.
Zoom In and Out
Use the magnifying controls to inspect your image more closely or zoom out to see more of the workspace.
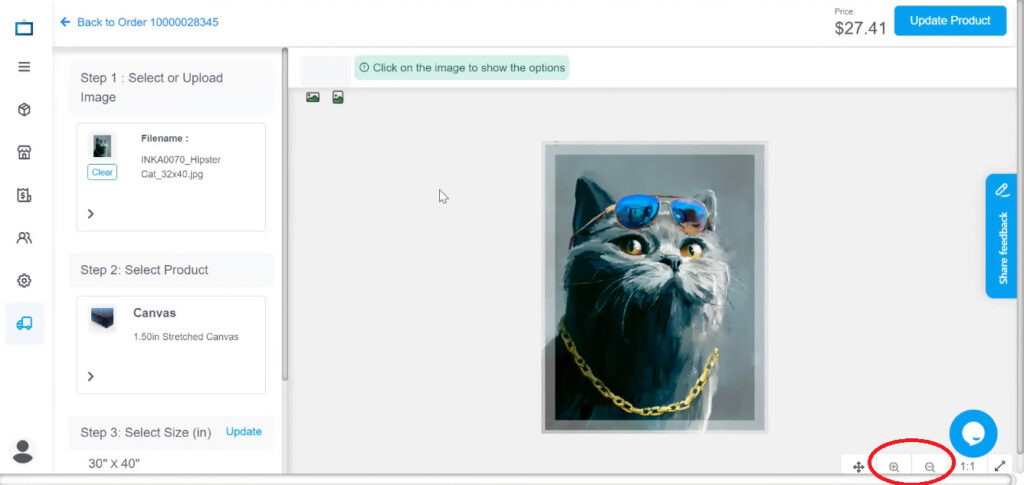
Zooming in can help you inspect important details near the edges of the print area.
Move Tool
Use the move tool to reposition the artwork within the editing area.
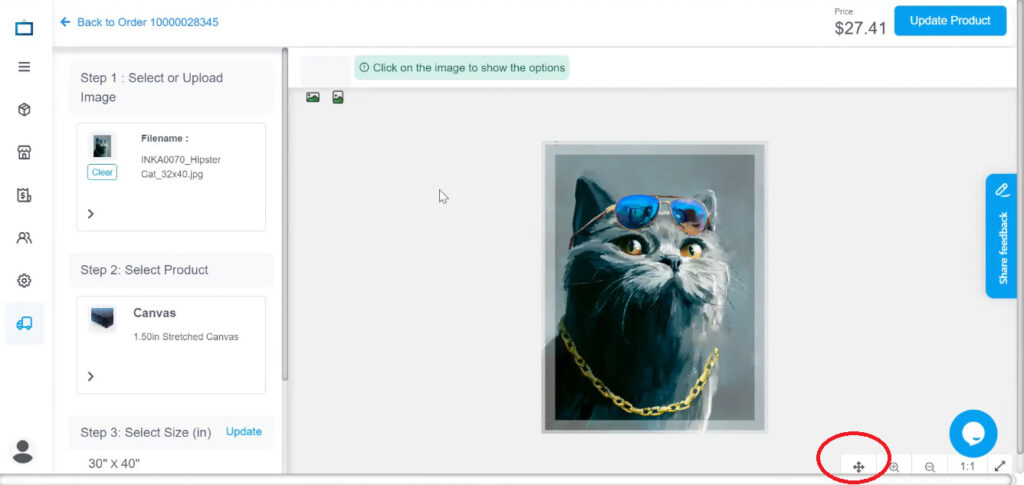
This is useful when the image needs to be shifted slightly to improve the crop or keep an important subject within the visible area.
1:1 View
Use the 1:1 control when you want a closer view of your image.
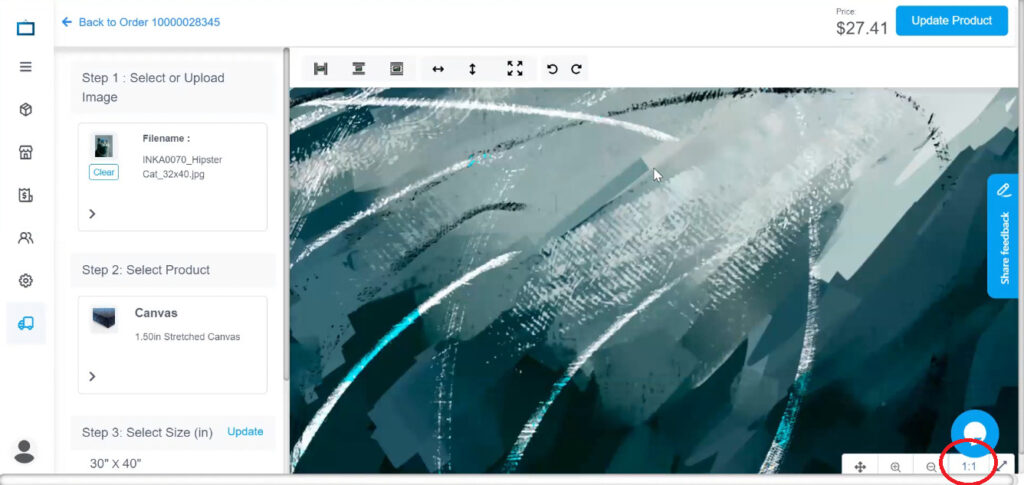
Fit View
The diagonal-arrow control lets you pull back and view more of the working area.
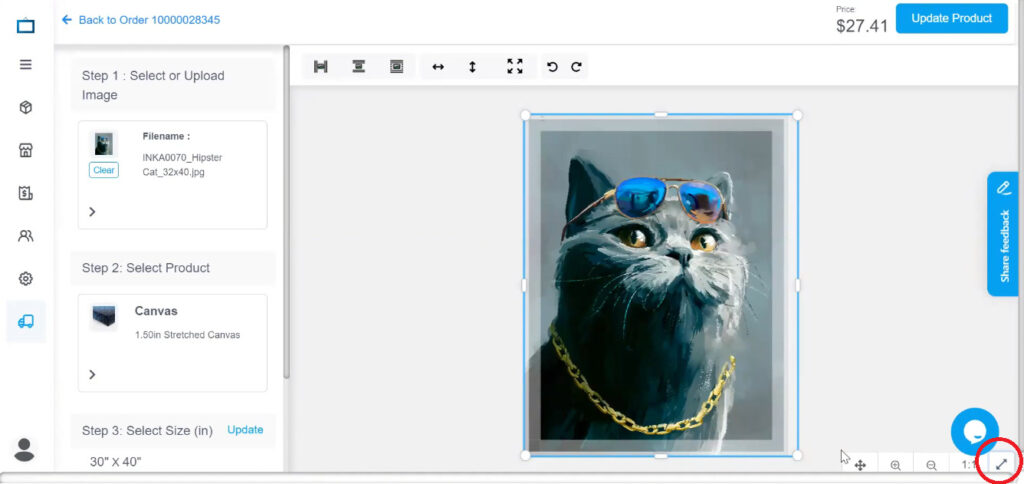
Moving between detailed and full-workspace views makes it easier to check both image quality and overall composition.
Image Editing
Orientation
Use the orientation controls above the artwork to switch between horizontal and vertical layouts when appropriate for the selected product.
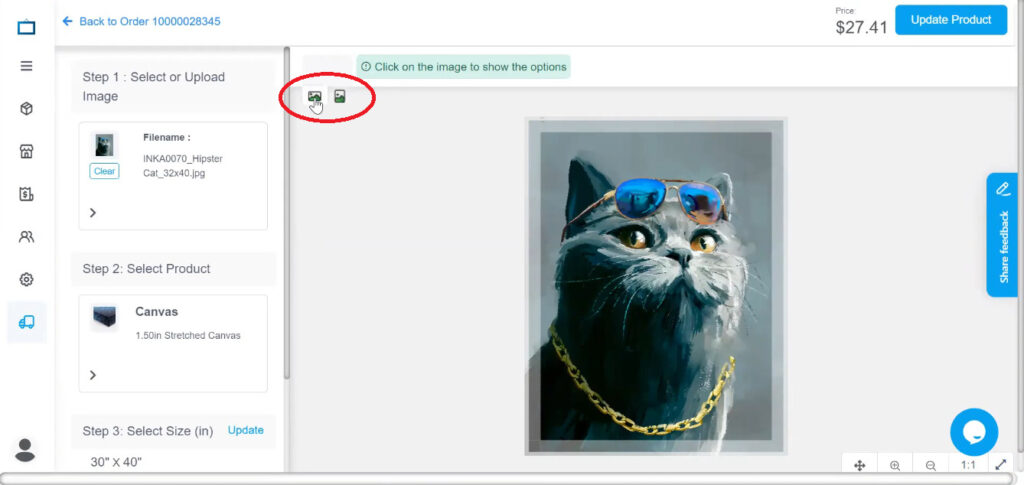
Changing orientation can affect how much of the image fits within the print area, so always check the resulting crop before continuing.
Centering Your Artwork
After selecting the image, additional positioning controls become available.
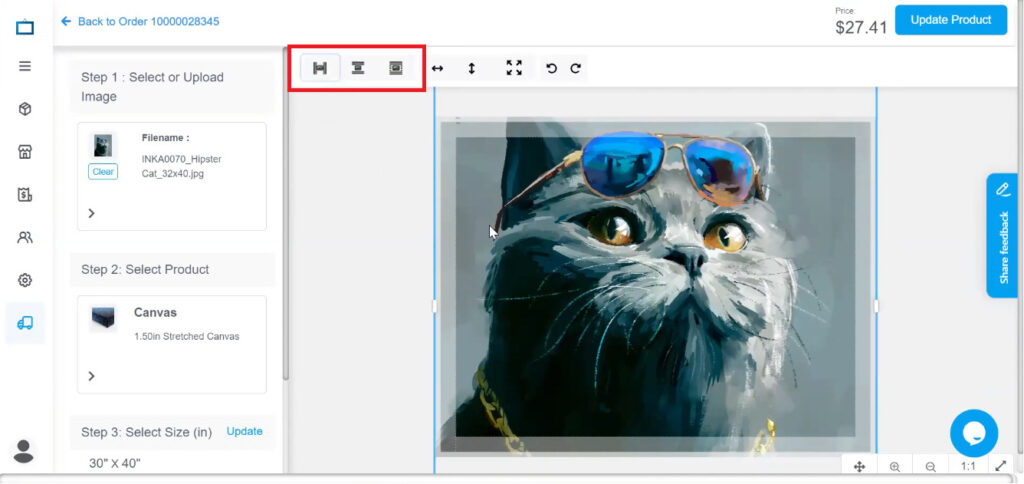
Use:
- Center X to center the image horizontally.
- Center Y to center the image vertically.
- Center X & Y to center the image both horizontally and vertically.
Automatic centering is a useful starting point, but it does not mean the composition is always finished.
For example, a portrait may look better slightly above the exact center, while a landscape may need to be repositioned to keep the horizon or main subject where you want it.
Use the centering controls first, then make smaller adjustments if necessary.
Fitting Your Image to the Print Area
The fit controls help scale and position your artwork within the available workspace.
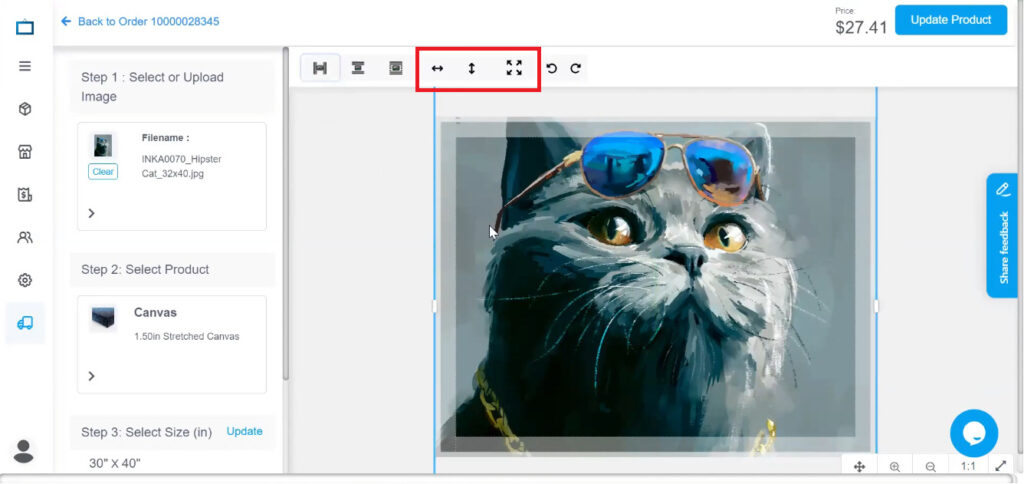
Available controls include:
- Fit to Width
- Fit to Height
- Fit to Workspace
Use these tools as starting points when positioning artwork.
Avoid forcing an image into proportions that noticeably distort the original artwork. If the selected print size uses a different aspect ratio, cropping or choosing another print size will usually give you a better result.
Rotation
The rotation tool lets you rotate your image in 90-degree increments.
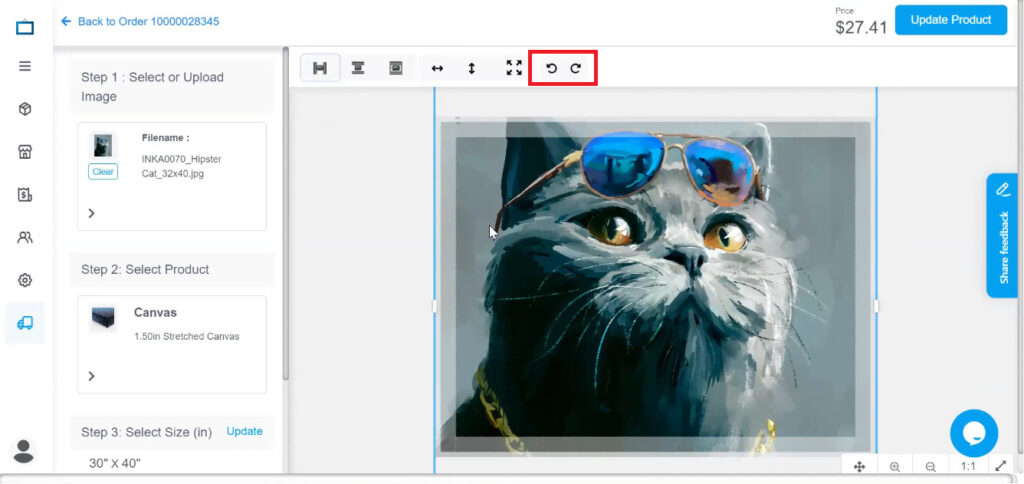
After rotating, review the complete image again and make sure no important details have moved outside the visible print area.
Choosing Canvas Border Options
If you are ordering canvas prints, border style is an important part of the final presentation.
The editor lets you preview how the artwork will continue around or interact with the sides of the canvas.
Lumaprints offers three main canvas border styles: Image Wrap, Mirror Wrap, and Solid-Border Wrap.
Image Wrap
With Image Wrap, the image continues from the front of the canvas around its sides.
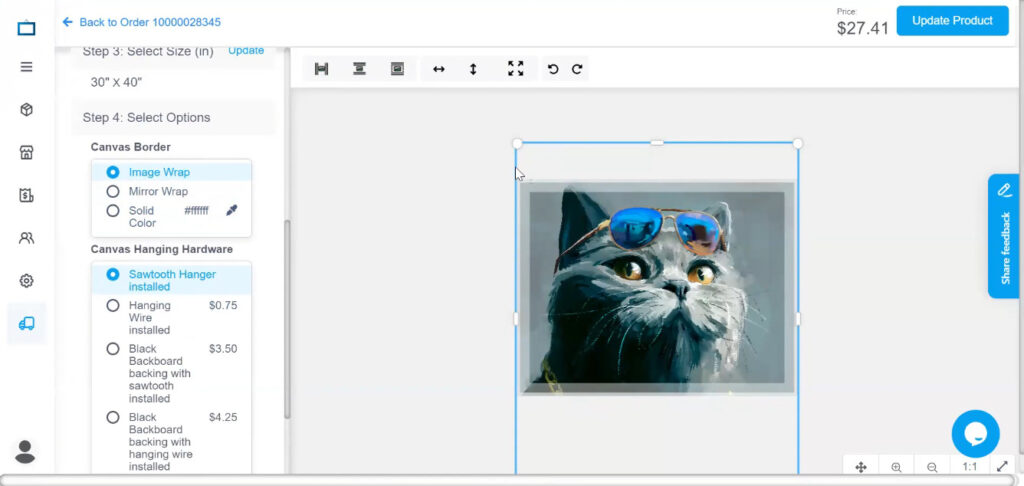
This creates the traditional gallery-wrapped canvas look.
Before selecting it, check the image edges carefully. Important faces, text, signatures, or other details close to the edge could move onto the sides of the canvas.
Mirror Wrap
With Mirror Wrap, the edges of the artwork are reflected onto the sides of the canvas.
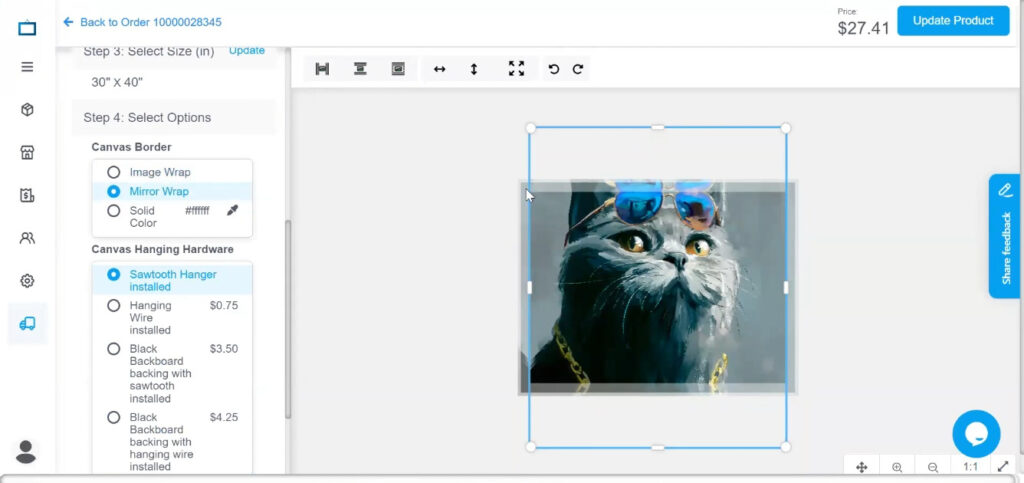
This keeps more of the original image visible on the front and can be useful when important details sit close to the edges.
Solid-Border Wrap
A Solid-Border Wrap uses a solid color on the sides of the canvas instead of extending or reflecting the artwork.
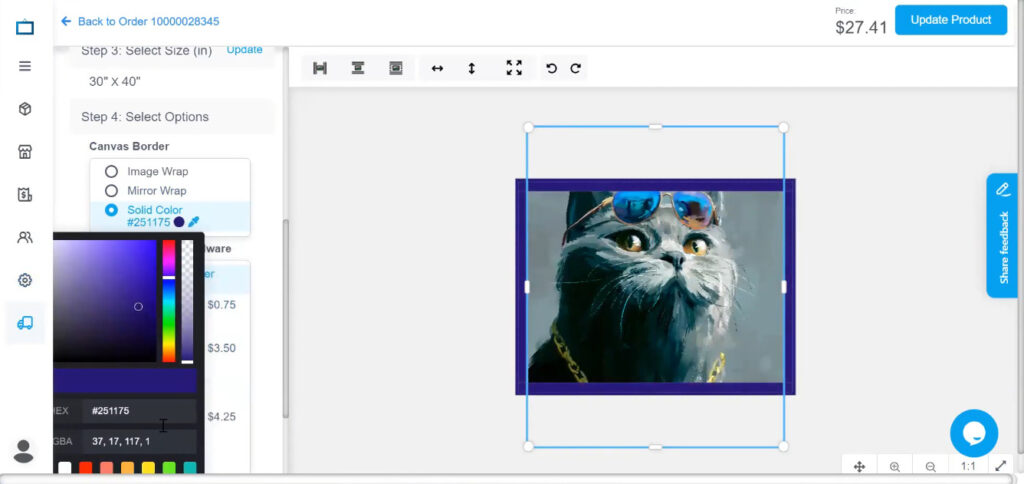
This creates a clean presentation while keeping the full composition on the front of the canvas.
Choose a border color that supports the artwork without distracting from it.
Review Your Multiple Product Order Before Checkout
Once everything has been added, take a few minutes to review your multiple product order before submitting it.
For every item, confirm:
- Artwork
- Product type
- Print dimensions
- Orientation
- Quantity
- Border option
- Hanging hardware, when applicable
- Image placement
This final review becomes increasingly important as the number of products in your cart grows.
If two items look similar, open them individually rather than relying only on the cart thumbnail.
A quick review now can prevent a much more time-consuming correction later.
Managing Personalized Orders From a Connected Store
If you have connected an Etsy shop or another ecommerce store to Lumaprints, customized orders may need a slightly different workflow.
For personalized artwork, you may want an opportunity to check names, dates, photos, text, or other customer-specific details before an order enters production.
Review the order-submission settings for your connected store and choose a workflow that gives you enough time to inspect customized orders before fulfillment.
For more information on connecting your ecommerce store, product mapping, and automated fulfillment, see the print on demand integration page.
Ordering Multiple Products vs. Managing a Large Product Catalog
Multi-product ordering is useful when you need to place several products into one order.
If you run an ecommerce store with dozens or hundreds of product variants, however, bulk order management may require a more scalable approach than setting up products individually.
Lumaprints’ Bulk Mapping guide explains how connected-store sellers can map multiple products and variants using Excel or Google Sheets.
Bulk Mapping can be particularly useful when you manage:
- Many artwork designs
- Multiple print sizes
- Several frame options
- Large numbers of product variants
- A growing print-on-demand catalog
For individual orders, the multi-product workflow gives you direct control over each item. For larger ecommerce catalogs, product mapping and automation can reduce repetitive setup work.
Q&A Session
- I recently connected my Etsy store to Lumaprints. Can you explain the process for managing personalized or customized Etsy orders with a connected shop?
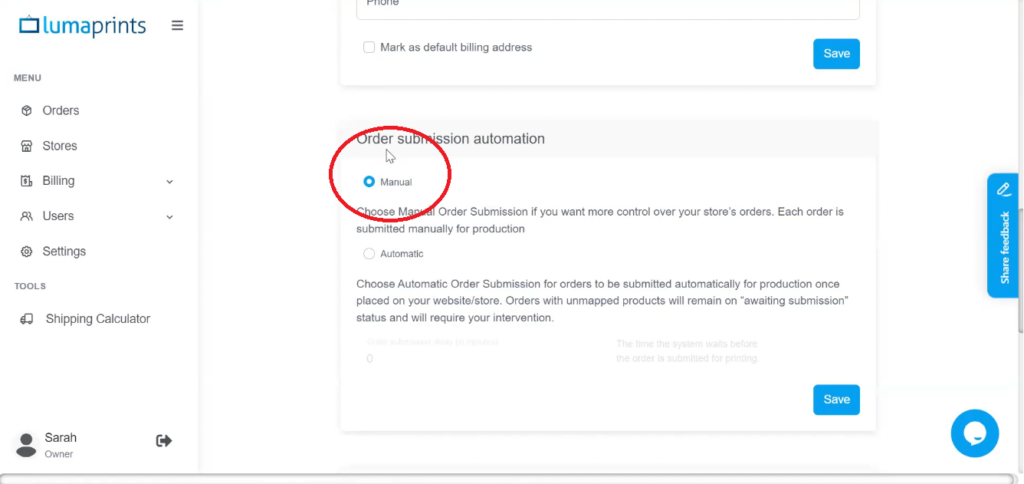
- When processing custom or personalized orders with a connected shop, we recommend using Manual Order Submission to prevent the orders from automatically processing (if you previously chose Automatic Order Submission).
To change this, go to your Stores on the left side of the dashboard and click Store Settings beside the connected store you want to modify the settings.
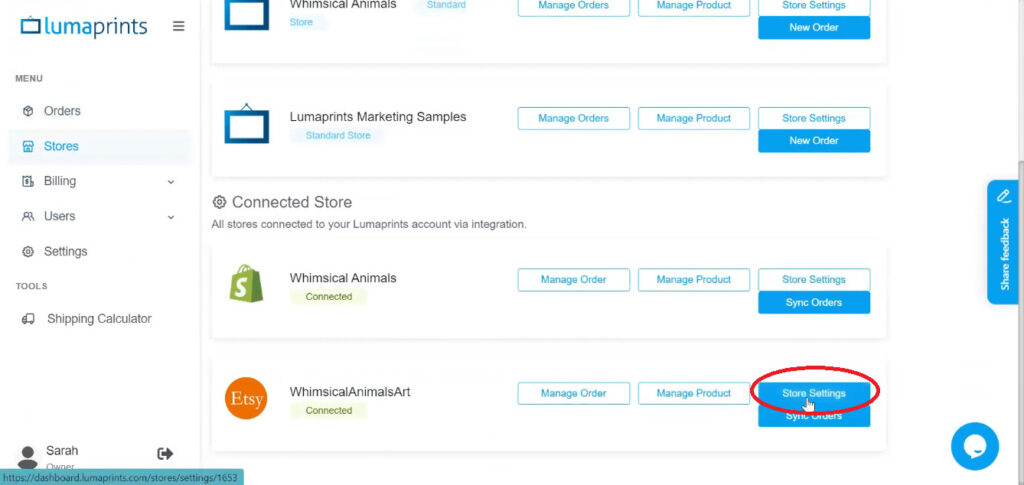
Scroll down to see the Order Submission automation section in your settings. Click Manual to toggle off automatic order submissions.
- How close are you to making multiple products in a store? (An order including a multiple image like a triptych or diptych)
- Triptych and diptych art will be available on our ordering site by the end of 2023 or early 2024.
Watch this webinar through this link: Multi-product Ordering and Editing – Lumaprints Learning Series 14
All previous and upcoming webinar videos are available on our YouTube channel: Lumaprints YouTube Channel