
For our third webinar, our team of experts guides you through the important steps before submitting your images to Lumaprints. We delved into how to capture your design for non-digital pieces, prepare for digital and non-digital art or photography, set up the recommended DPI and resolution, prepare your image for large print production, and choose a color profile. In this webinar, we also address common questions sent by our customers, so stay tuned toward the end of the blog!
If you like reading more than watching, we’ve got you. Read on for all the instructions. You can also jump to any topic you want from the list below.
Capturing your Physical Designs
Preparing Digital Art and Photography
Editing your DPI and Resolution
Checking the Quality of Your Image
Having a good image file for print is essential because of the following reasons;
- Ensures successful reproduction of your art, photo, or design.
- Minimizes the chances of blurriness, fuzziness, or noise on the final print.
- Limits skewing when resizing images for prints.
- Lessens the difference between the digital and physical copies of the print.
Capturing your Physical Designs
For your non-digital designs that need to be digitized, we suggest two ways to capture your work;
- Scanner. An excellent option for small, sharper designs with more controlled lighting. Just ensure your scanner can capture fine print in high-quality 300 dpi. We recommend testing the scanner first and comparing it with your physical design.
- Camera or Latest Smartphone. Taking a photo of your work is also an option as long as you have a good source of light and, ideally, a stand or tripod in an indoor studio. We can also recommend using smartphone models from 2020 to the latest for a budget-friendly way of digitalizing your design.
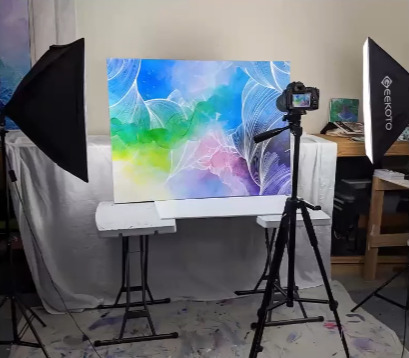
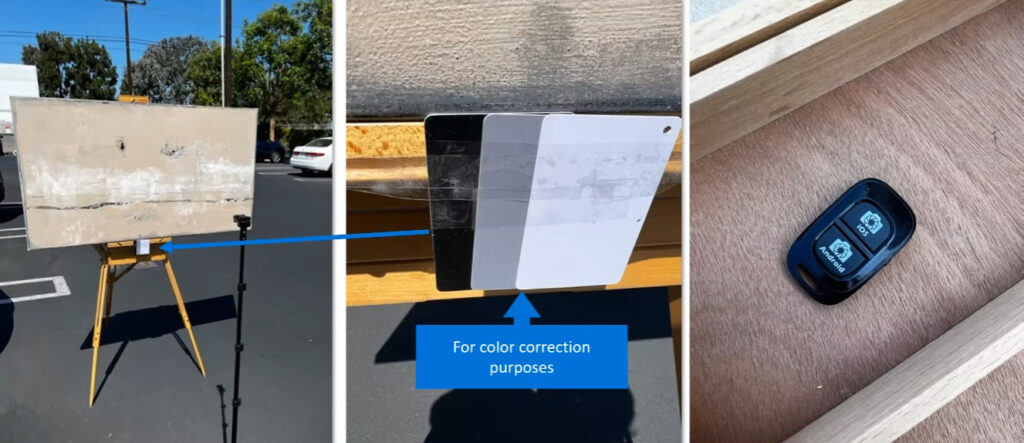
- Another alternative for an indoor studio is capturing your art outdoors. We recommend taking the picture outside in the morning when it’s a little sunny and slightly overcast to soften the sunlight. Try to position your print in a place with no shadowing.
- This image below is an example of an outdoor studio we did to digitize the work of one of our customers. We attached a gray card containing a neutral gray for color correction purposes when editing. We also used a wireless device to capture the image at a short distance, preventing casting a shadow on the artwork being captured.
Preparing Digital Art and Photography
For digitalized designs and images, we suggest the following for your files:
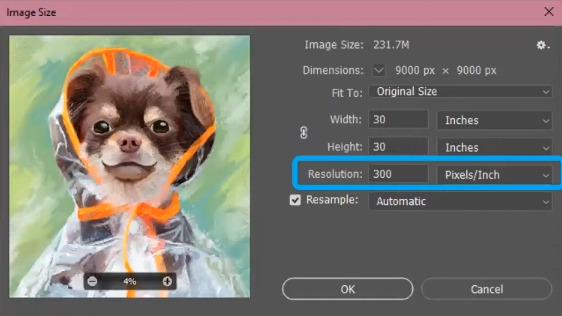
- DPI. We recommend a 200 DPI minimum for canvas prints and a 300 DPI minimum for Fine Art Paper Prints.
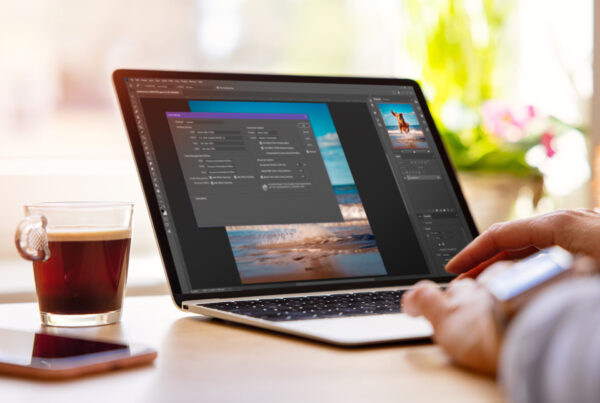
- Color Profile. Please make sure your Photoshop Color Settings (Ctrl + Shift + K) are set for Accurate Prints.
If your file does not have an embedded color profile, colors may print incorrectly.
Follow the steps below exactly to ensure your image prints as expected.
Step 1: Set Your Photoshop Color Settings
(Updated 4/28/26)
Before opening your file, set the following:
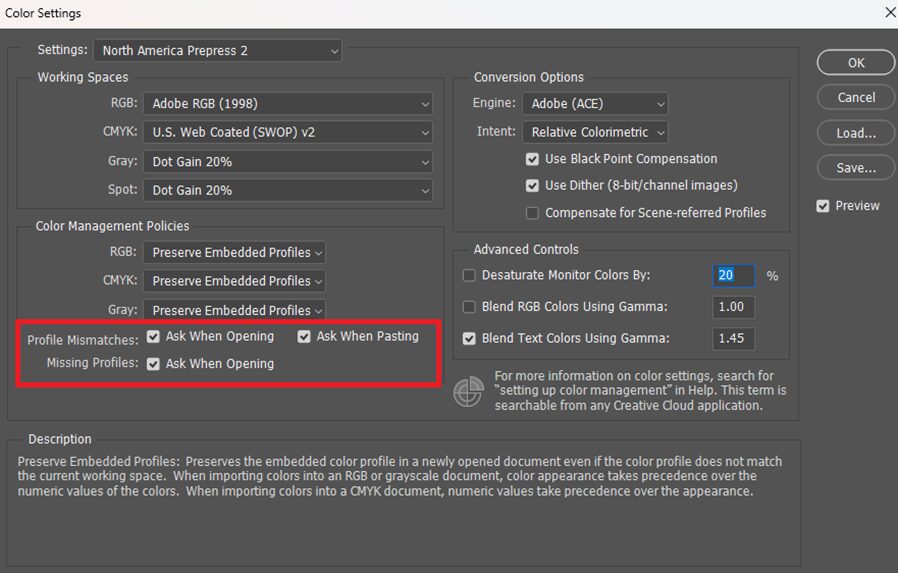
- Open Photoshop Color Settings (Ctrl + Shift + K on PC)
- Make sure these are enabled:
✅ Profile Mismatches: Ask When Opening
✅ Missing Profiles: Ask When Opening
✅ Ask When Pasting
Why this matters:
These warnings alert you if a file has incorrect or missing color information. Without them, Photoshop may silently open files with unmanaged colors, leading to unpredictable print results.
Step 2: If You See a “Profile Mismatch” Warning
This means your file’s color space differs from your Photoshop default.
If the color profile is sRGB.
Select:
✅ Use the embedded profile (recommended)
Avoid:
❌ Discard the embedded profile (don’t color manage)
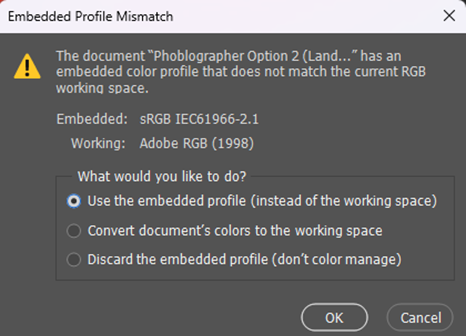
If you notice color shifts after conversion
- Adjust the image as needed while working in Adobe RGB (1998)
- Fine-tune brightness, contrast, and colors until satisfied
Once adjustments are complete, proceed to Step 3.
If the color profile has other embedded profiles (Display P3, ProPhoto RGB, or CMYK)
Select:
✅ Convert the document’s colors to the working space.
This ensures the file is properly aligned with our working space: Adobe RGB (1998)
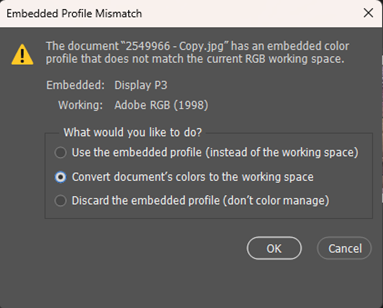
If you notice color shifts after conversion
- Adjust the image as needed while working in Adobe RGB (1998)
- Fine-tune brightness, contrast, and colors until satisfied
Once adjustments are complete, proceed to Step 4.
Why this matters:
- Converting sRGB → Adobe RGB does not cause visible shifts because Adobe RGB’s gamut includes sRGB.
- Converting Adobe RGB → sRGB can potentially cause clipping, since colors outside sRGB’s smaller gamut must be shifted. There will be no shifting if all of the images’ colors fall within the sRGB range.
- Using the embedded profile respects the original color data, while discarding it removes color management entirely.
If you notice color shifts after conversion, adjust brightness, contrast, and colors while working in Adobe RGB (1998).
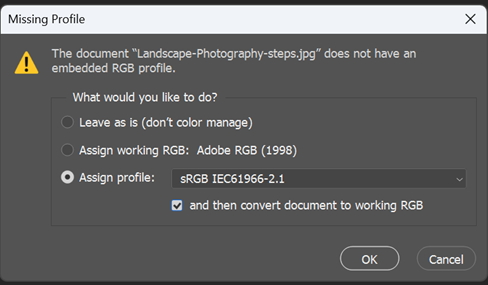
Step 3: If You See a “Missing Profile” Warning
This means the file has no color space assigned.
Do NOT select:
❌ Leave as is (don’t color manage)
Recommended:
✅ Assign sRGB
✅ Then convert to Adobe RGB if needed.
Why this matters:
- Assigning sRGB is safest because most cameras and software default to sRGB.
- Assigning Adobe RGB to an sRGB-origin file oversaturates colors, especially skin tones (unnatural orange/red).
- Converting to Adobe RGB after assigning sRGB embeds the preferred working profile without introducing oversaturation.
- If you are absolutely certain that the original edits were originally done in AdobeRGB, then you can assign AdobeRGB.
Step 4: Final Check Before Saving
- Review your image colors carefully
- Use a calibrated screen if possible
- Enable soft proofing to preview print results
Why this matters: Soft proofing shows how colors will shift when printed, allowing you to make corrections before finalizing.
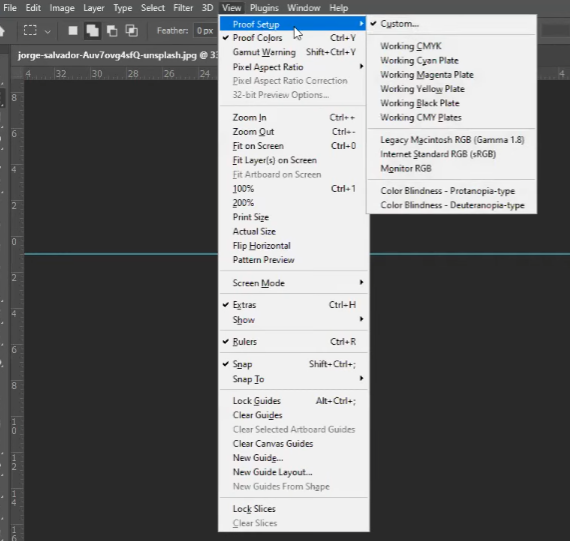
Soft Proofing Setup in Photoshop:
To help you preview this before printing and better predict any color shifts, we recommend using soft proofing in Photoshop along with a calibrated monitor.
To soft proof in Photoshop:
- Install the attached ICC profile.
- On Windows, you can double-click it or right-click and select “Install Profile.”
- Open your image in Photoshop, then go to:
- View > Proof Setup > Custom
- In the “Device to Simulate” dropdown, choose the ICC profile you had just installed.
- Set the following options:
- Rendering Intent: Relative Colormetric
- Check Black Point Compensation
- Check Simulate Paper Color
- Make sure the Preview box is checked to see the effect
With soft proofing turned on, you’ll be able to see how certain colors may shift when printed and make adjustments before submitting your final file.
Step 5: Save Your File Correctly
When saving your file:
- Choose JPG or PNG
- Make sure ICC Profile: Adobe RGB (1998) or sRGB is checked
This ensures the color profile is embedded.

If you have any questions, please do not hesitate to reach out to our team!
Editing your DPI and Resolution
Two important factors in an image are its DPI and resolution. Here’s a chart of the minimum DPI per sample size and the optimal DPI, whether you’re turning it into a canvas print or fine art print.
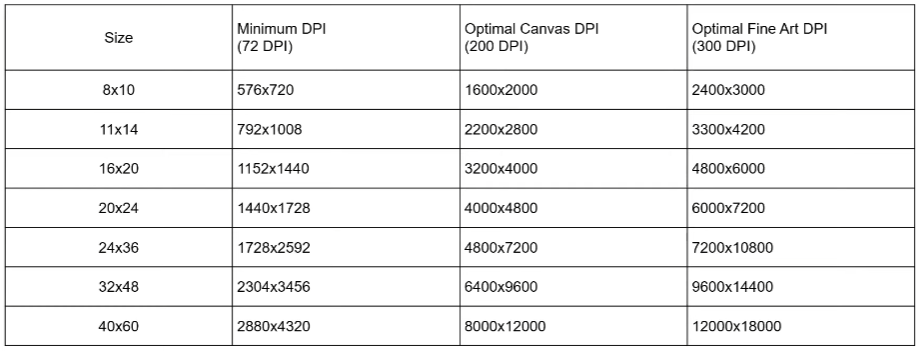
The higher the DPI, the larger the resolution. However, a high DPI and large resolution will not guarantee a high-quality image.
We always suggest working on bigger sizes first, then scaling the DPI and resolution down to have a good-definition image.
A few notes about DPI and Resolution:
- A lot of times, the quality of the image is more important than DPI. For example, if you start with an already blurry image and want to upscale it, no matter what upscale is done, the image will still be blurry because the base image is blurry.
- There are a lot of good upscaling software that use fractal technology or AI technology, which sometimes produces better results than Photoshop’s upscaling.
Aspect Ratio and Resizing
Aspect ratio, the ratio between the height and width of your image, is important. It helps standardize imagery for print and makes it easier for you to provide it to your customers in small, medium, and large sizes. Here are some of the common aspect ratios:
- Squares: 1:1
- Rectangle: 3:2, 4:3
- Panoramic: 1:3, 1:2
For images that may not exactly fit the size you would like, here is how you can resize your image with minimal warping.
On your Photoshop, click Image and Image Size. Link the width and height.
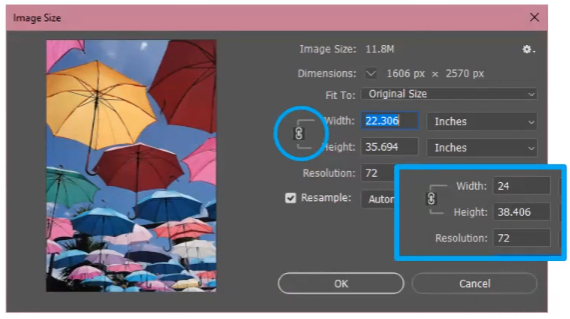
If you don’t have Photoshop, you can explore a bunch of good free or one-time purchase software with similar settings to Photoshop, like Gimp, Clip Studio Art, Medibang, etc.
- In resizing, you must first round up or down your image’s resolution to fit your aspect ratio, then proceed to cropping or stretching as needed.
- We have a live demo of cropping and stretching on our YouTube channel. You can view it through this link: https://youtu.be/saKIerEl1ro?t=1143 (link automatically starts at timestamp 19:03)
- Please note that our New Lumaprints ordering site has a feature that allows you to stretch and resize images easily.
Checking the Quality of Your Image
Before sending the image to us, you can check the quality of your image and how it will actually appear once printed using the ruler test to help you see the image in its true physical proportion.
- After resizing your image, you’ll need to make your software ruler visible and grab a physical ruler. Scale the software ruler by zooming in and out until the inches line up. You can then check if the image has any blurry or pixelated areas.
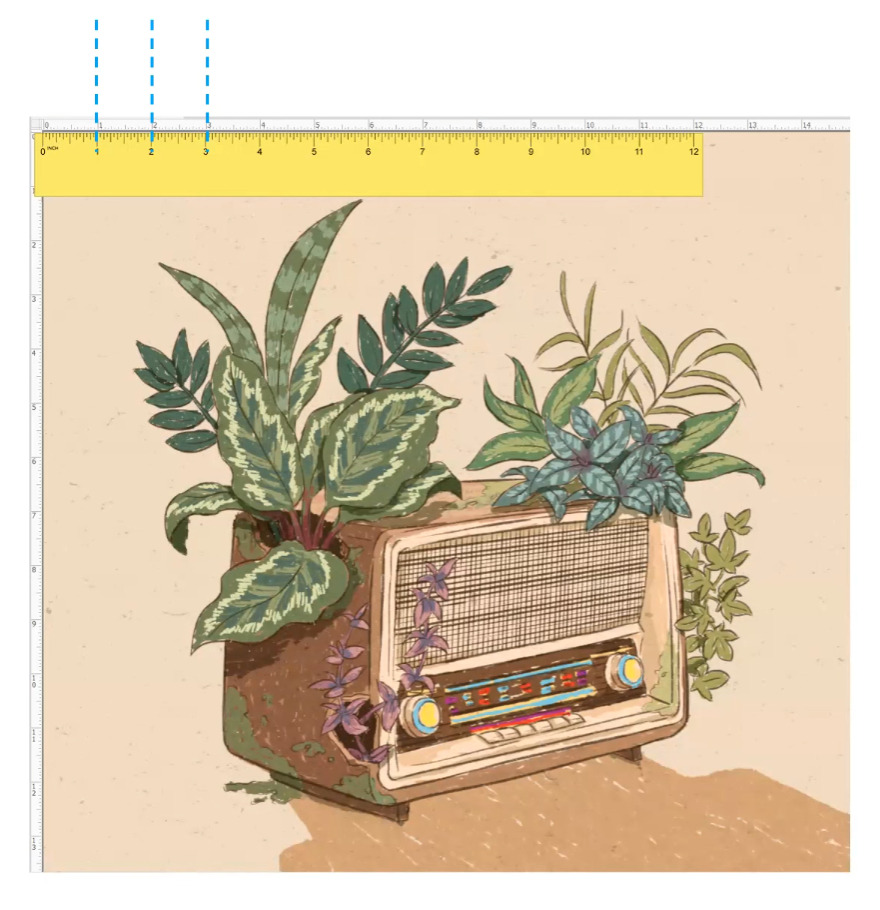
- Make sure to do this ruler test once you have resized and edited your image to your desired DPI and resolution.
- When upsizing an image, this ruler test is handy to see if your image can upsize without losing its quality. If your image appeared to be blurry or pixelated, it may be worth considering going for a smaller print size.
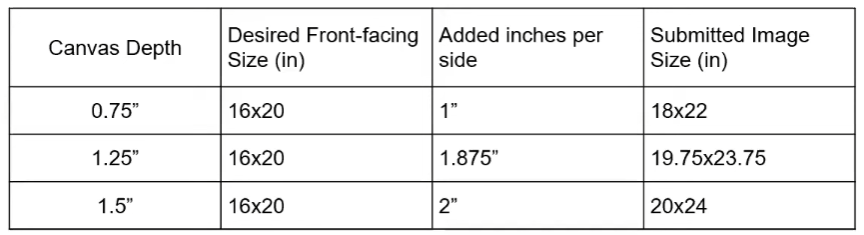
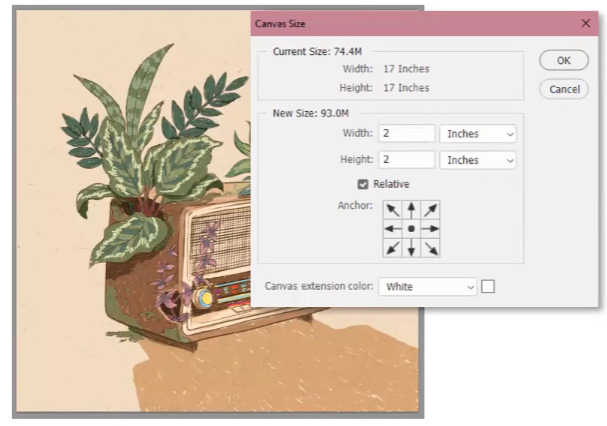
Creating Canvas Wrap Border
If you want to see a part of your image along the sides of your canvas, we recommend creating a wrap border on your final print file.
- To do so, first, we need to add space on the sides of your image. Here is the guide to the amount of space you need to add depending on your desired size and canvas’ depth:
- You can do one these three wrap options:
- Image Wrap. A classical canvas effect where the main image continues over the sides of the canvas.
- Mirror Wrap. The edges of the image get reflected or ‘mirrored’ over the sides of the canvas.
- Border Color Wrap. The edges of the canvas are a solid color. Black and white are the most common colors, but you can choose any color you like.
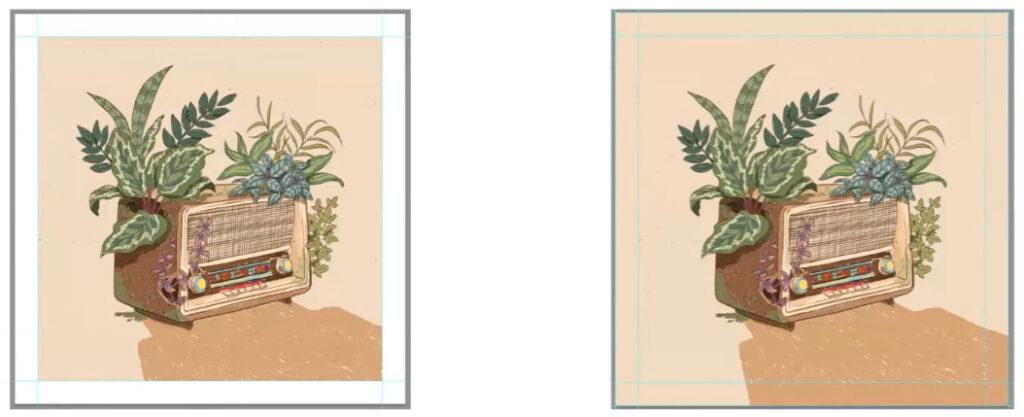
- To make your own wrap, go to Edit > Canvas size and add the required inches per the chart above.
You can watch a live demo of how to add guides from our Youtube channel through this link: https://youtu.be/saKIerEl1ro?t=1597 (the link begins at timestamp 26:37)
- Then, you can add guides so you don’t edit into the original image. You can then fill the added sides with your desired design, color, or, for continuity, content-aware.
Q&A Session
- Can you show soft proofing in Lightroom, and should the image be 100% within gamut? Or is there some minor or modest out of gamut. Assuming you use perceptual rendering. Further, can we specify perceptual or relative depending on what makes the most sense for the image being printed?
- We usually do the proofing via Photoshop, not Lightroom, so we might not have all the sources for Lightroom. There are online tutorials, but for our team, we’re going to be using it through the lens of Photoshop.
To view the proof via Photoshop, click View, then click Proof Setup.
- We usually do the proofing via Photoshop, not Lightroom, so we might not have all the sources for Lightroom. There are online tutorials, but for our team, we’re going to be using it through the lens of Photoshop.
We have a live demo of how to view proofing through one of our webinar videos on YouTube. You can view it through this link: https://youtu.be/saKIerEl1ro?t=1914 (the link starts at timestamp 31:54)
- What is the file size limits when we upload? Has this increased for the new site? A 200 DPI to 300 DPI are resulting to 200MB file sizes.
- The file size limit for the new website is 100MB. However, for images you cannot upload to the ordering site because of size limitations, you can email them to us at [email protected] and use file-transferring services like WeTransfer or Dropbox.
- We recommend finishing uploading, placing, and processing an order first before sending us the large file. That way, you can indicate your order number, and our team will know for which order the emailed file would go.
- What is the best color space for printing at Lumaprints, and will end up fairly true to what we see on the calibrated monitor? Also, what does the protective coating applied to the canvas after the image? Do we need to factor in the brightness or the contrast when prepping our images?
- We recommend retaining the actual ICC profile that your image has acquired, either from our team or from the combination of paper and printer to proof against.
- Our printers exceed a little more of the standard RGB but don’t fully cover the Adobe RGB space. This means that there are colors that Adobe RGB has that are not possible for the printers to physically hit currently. That’s why it’s important to do soft proofing whenever possible.
- We don’t use a protective coating on our canvases. Rather, our canvas and eco-solvent inks are a little bit more durable than our competitors. The inks we use are good quality and minimize getting bumped and bruised, even when rubbing into it. The inks do not affect the images, nor do you have to accommodate contrast or brightness.
- Note: If your monitor is already color calibrated, you can use the soft proofing with the print profiles. Another recommended option is to order a color on a rolled canvas from us so you can see how the colors would look on the physical prints.
- If I correctly prepare an image for 16×20 reproduction, can I use the same image for a small print or canvas? Would it be better to upload an image for a smaller print or canvas, or would it be better to upload an image in the specific size required for that reproduction?
- We recommend staying within the same range of aspect ratio when downscaling an image so you won’t have to worry about cropping and skewing.
- In some cases, on smaller sizes like 11×14 or 8×10, you can do small aspect ratio changes when downsizing, as it won’t make a huge difference.
- Do you recommend a gray card or white balance?
- It depends. You can make further adjustments to your image, but at the very least, a gray card should give you a good starting point.
- How many canvas printers do you have, and do you profile each one separately? Also, how often do you profile printers?
- We have Epson eco-solvent printers for canvas printing and Epson and Canon aqueous pigment printers for our paper prints. We do a bi-weekly color accuracy check to ensure the colors have not drifted.
Helpful Tips
- By default, we recommend assigning your images with standard RGB and then converting them to Adobe RGB.
- To prevent your image from looking washed out from the printer, we recommend using the American pre-press settings. In using this, it will give you a warning when your opened file does not have an embedded color space.
- For digital designers and artists (creating designs in pixel form), we recommend starting your work with a larger canvas instead of a small one. With a large base file that already has more pixels and resolutions built inside of it, it’s always easier to downscale without loss of quality.
- For photographers, we recommend setting your camera to its highest setting to capture as large an image as you can and downsize from there.
- A gray card is pretty cost-effective. You can buy it for cheap on Amazon. You can also use a gray card for calibrating the colors or your scans.
Watch the full webinar on YouTube through this link: https://youtu.be/saKIerEl1ro?si=c2omn2Azn3pzDpa9
More webinars are available to watch on our YouTube channel: https://www.youtube.com/@lumaprints
Very helpful for beginners.
Thank you so much!