If you’re an e-commerce enthusiast looking to expand your online store or a budding entrepreneur eager to start your own digital storefront, you’re in the right place. In this article, we’re going to take you on a journey through the step-by-step process of creating product listings on Shopify. Whether you’re a seasoned seller or just starting, our guide will prove invaluable, especially if you’re working with fulfillment partners like Lumaprints.
If you like reading more than watching, we’ve got you. Read on for all the instructions. You can also jump to any topic you want from the list below.
Creating Separate Product Pages
Crafting Detailed Product Descriptions
Creating Appealing Product Images
Establishing SKUs (Stock Keeping Units)
Addressing Marketplace Listings
Handling Orders with a Fulfillment Partner
Creating Separate Product Pages
Before you start creating product listings, it’s crucial to have a clear understanding of the types of products you’ll be selling. To make it easy for your customers, consider organizing your products into separate pages or collections based on their types, such as canvas prints, paper prints, and apparel.
Rather than listing all product types together, we recommend creating separate product pages for each type. For instance, have one page for canvas prints, one for paper prints, and one for apparel. Shopify allows you to do this efficiently using Collections. This separation makes it visually clear for customers to navigate your store.
Optimizing Product Titles
When creating your product titles, it’s essential to be descriptive and include relevant keywords. For example, if you’re selling a canvas print of palm trees, make sure your title includes relevant keywords. This helps with search engine optimization (SEO) and ensures your products are easily discoverable.
Crafting Detailed Product Descriptions
Your product descriptions should provide customers with essential information about the product. Start by describing the image itself and then dive into the quality of the print. Be sure to highlight the unique features of your products and any additional options you offer, such as framing or specific material details. Providing care instructions can also demonstrate your commitment to customer satisfaction.
Creating Appealing Product Images
In your product listings, you should include multiple types of images to help customers visualize the product. Include:

- The image on the product.
- The image displayed in a mock-up.
- An unedited image of the product.
Using mock-up templates can make this process easier, and you can find various options online or you can go to www.lumaprints.com for mock-up templates. Choose mock-up backgrounds that complement your product’s aesthetic, making it more visually appealing to potential customers.
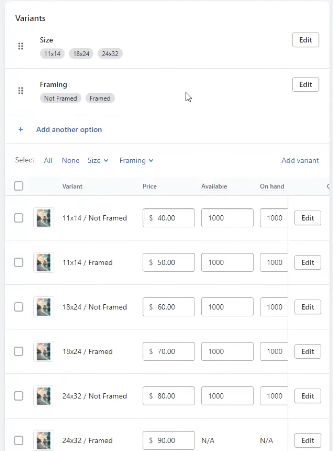
Setting Up Product Variants
If you offer different sizes, materials, or customizations for your products, make use of Shopify’s variant feature. This allows you to create clean and organized product listings. Keep the number of variants reasonable, typically around six to eight, to prevent confusion for both you and your customers.
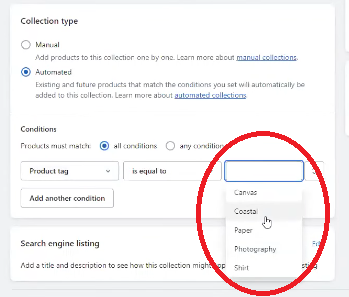
Utilizing Product Tags
Tags are handy for categorizing your products internally and for creating collections or promotions. Tag your products with relevant keywords and attributes. This makes it easier to create collections or highlight specific product genres when needed.
Establishing SKUs (Stock Keeping Units)
SKUs are unique identifiers for your products and their variants. These identifiers help both you and your fulfillment partner manage and track orders efficiently. Ensure your SKUs include details such as product type, size, and framing options. This practice simplifies order processing and reduces the risk of errors.
Addressing Marketplace Listings
If you’re selling on online marketplaces like Amazon or Etsy, consider tweaking your product titles and descriptions to include additional keywords relevant to your image, such as “Sunset,” “Beach,” or “Botanical.” This can improve your product’s visibility in competitive marketplaces.
Handling Orders with a Fulfillment Partner
When a customer places an order, your fulfillment partner will receive all the necessary details, including the product, variant, and customer information. For the first order, you may need to manually process it on the fulfillment partner’s website. However, for subsequent orders, you can enable automatic processing to streamline the fulfillment process.
Shipping Orders
When it comes to shipping details, you’ll need to account for factors like product size, weight, and shipping costs. For Shopify users, Lumaprints provides a shipping calculator that can help estimate shipping costs for different locations. You can use this information to set appropriate shipping rates for your customers, factoring them into your product prices.
If you have international customers, consider using a shipping routing platform like Order Desk to route orders to different fulfillment partners based on shipping destinations. This can help manage orders efficiently, especially if you have multiple fulfillment partners for different regions.
Conclusion
Creating effective product listings on Shopify is crucial for attracting and retaining customers. By following these steps and optimizing your listings, you can provide a seamless shopping experience for your customers while ensuring efficient order processing with your fulfillment partner like Lumaprints. If you have any more questions or need further assistance, feel free to reach out to our customer service team at [email protected] or check out our webinars for additional guidance through the links below.
Watch this webinar through this link: https://youtu.be/tEYGbCA-uW4?si=WxQ9uyQ0lifG8i0I
All previous and upcoming webinar videos are available on our YouTube channel: https://www.youtube.com/@lumaprints