When selling a product online, it’s not enough to just write about it. You need to make it look good, too. Product photography is an essential part of any business’s online presence, and it’s not just for visual appeal. It’s the first thing customers see when they visit your website and could determine whether they should buy your product. It can make or break a purchase, which proves that a picture is not just worth a thousand words, but can also be worth a thousand dollars in sales.
Most online customers base their purchases on the product images they see, and some of the return-to-seller items result from complaints that the item wasn’t exactly like it appeared in the picture. Customers have a reasonable expectation that what they see should be what they receive.
Investing in your product photos is always a good idea if you want to avoid losing out on possible sales, regardless of whether you choose to do it yourself or hire a professional product photography studio. Do yourself a favor and avoid these 10 common mistakes when shooting your products to create a positive appearance.
1. Poor Lighting
 Photography, in general, and product photography, in particular, rely heavily on proper lighting.
It’s best to get the lighting correct from the beginning, as there is only so much that can be done in post-processing or editing if the lighting is off, to begin with.
The most typical mistake is to use a combination of different kinds of lighting, such as natural light in addition to fluorescent lighting. If you mix them, you create unnecessary hurdles for yourself because other lights call for different white balance adjustments on the camera.
A lightbox is a worthwhile investment for displaying small items and is relatively inexpensive. A studio setting is ideal for photographing furniture and other large items.
If you have the budget, invest in professional studio lights to get good, consistent results. While natural lighting is always a good option, it lacks the control one might get from using studio lights.
It takes the right combination of lighting, shade, brightness, and highlights to achieve the best results.
Related: Take Great Photos in Low Light Situations
2. White Balance is Off
 If you want your colors to look just like they did in the original, you need to use the white balance option on your camera. Misadjusted white balance is the common culprit for photos that are too “warm,” meaning more yellowish/reddish or too “cool” or somewhat bluish.
You need to adjust the white balance to the lighting conditions. Images taken in fluorescent or LED lighting tend to be on the cooler side, while those shot in natural or “normal” lighting tend to have warmer tones. Using the white balance option on your camera is necessary to make up for both. As a last option, you can use your camera’s “auto” mode.
This is the reason why blending different light sources is a bad idea; it confuses the camera and makes getting a decent white balance considerably more challenging.
3. Distracting Props and Background
 Despite their potential to enhance a shot, using the wrong ones or too much can do the opposite.
It’s easier for customers to focus on the goods without being distracted by extraneous elements. Amazon even requires your main shot to solely show the product against a white background.
Other supplemental pictures are essential, though, for your primary product photographs, a basic white or light gray backdrop works best almost always. Customers are more likely to buy from you if they can concentrate on your goods, aided by a plain background that draws attention to them.
Having a lot of distractions around is just annoying. Props are lovely if used selectively or in conjunction with additional photographs, but you must almost always take your primary photos in front of a plain background.
Related: How To Style Product Photos
4. Capturing Unnecessary Reflections
 Once you’ve mastered lighting, the next challenge will be dealing with reflections.
When photographing in situations with more than one light source, a shiny surface might muddy up the image. Many of these issues may be solved by simply using diffusers with your light source or adjusting its angle. But there are a few extra concerns to be aware of, like taking pictures of glass bottles and other reflective materials where reflections can play a role in defining the product itself.
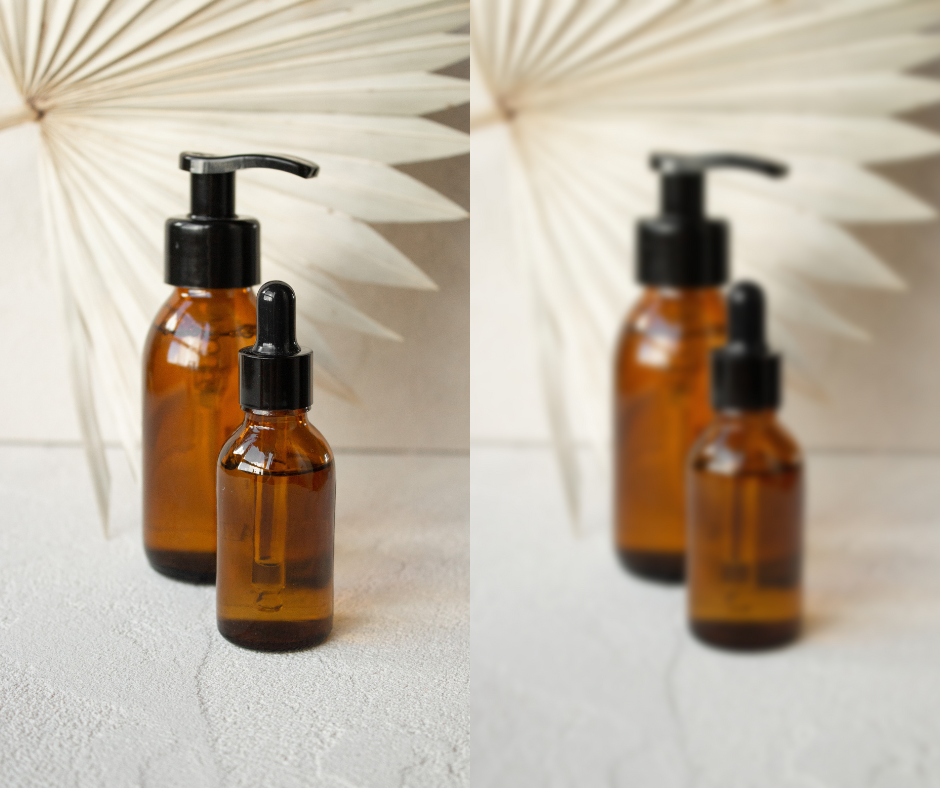
5. Blurred / Out-of-focus Pictures
 An additional typical issue is blurry images.
Two mistakes might lead to blurring. For starters, there’s the possibility of blur due to camera shake. To photograph products, you must always use a tripod. If you want to avoid blurry hands in your photos, use the camera’s shutter delay (timer) even when mounting the camera on a tripod. Any motion, no matter how slight, will show up as blurring in the final product.
The camera’s focus is the second factor that causes blur. It is best not to rush focusing after you have a shot lined up, as you cannot fix a lack of focus in post-production.
You can’t capture the entire image in sharp focus for some objects, especially when taking close-up photographs like pieces of jewelry. In these situations, concentrate on the shot’s key component and make use of additional images to highlight the product’s many features.
6. Unprepped Products
 Unexpectedly, poor preparation—or lack thereof—of the products themselves is one of the most frequent errors we encounter in product photography.
Make sure to clean, iron out any creases in clothing, and ensure the item is free of fingerprints and other stains before preparing it for a picture! These mistakes will inevitably be discovered and brought to light by the camera.
Also, make sure that any packaging you’re using is in pristine condition.
If you display your products poorly in product photography, the customer will assume that your products are of poor quality.
7. Too Few Pictures Were Taken
 You can frequently find items for sale on online marketplaces with only one or two pictures, and as a result, they do not show all of the item’s details or even the whole thing.
Take more pictures, and shoot them from various sides. The general guideline is to shoot more photos than you’ll need, as you can always delete the extras later. If you forget to take specific images and try to retake them later, you will have a hard time doing so.
It would be best if you take many pictures from different perspectives, like close-ups and longer shots where appropriate.
Taking more than the recommended number of photographs will only take a few seconds of your time and won’t incur any additional expense.
8. Scaling Issues
 The majority of products profit from real-world photographs rather than ones taken against a stark white background in a studio.
Context photos demonstrate how the product is used – things like carrying bags, wearing clothes, setting furniture in a room, and so on.
There have been many amusing tales told about people who ordered furniture online only to have it arrive and turn out to be miniatures.
Get a couple of photographs of the product in its natural environment to show its scale, so your consumers know exactly what they’re getting. Doing so will prevent unnecessary hassle down the road.
9. Omitting the Post-processing Stage
 One of the most essential steps in product photography is post-processing, sometimes known as retouching or editing all of your photographs.
Customers that want to check out your product before buying it, just like they would if they were shopping in a physical store, will carefully examine your images; therefore, they must be flawless.
Regardless of how excellent the initial shot is, it will need to be slightly retouched using Photoshop or other editing programs before you can use it for your online shop.
Tiny imperfections and minor irritants you missed while taking the shot can be fixed here. You can achieve the perfect white backdrop and adjust colors, highlights, and hues.
Since it requires time and knowledge of the editing software, which also needs time to learn how to use it effectively, this step is frequently ignored.
Even if you’ve successfully done all of the photography, outsourcing this phase is frequently the best option. Many experienced photographers do the same to save time and effort.
Related: Best Apps to Enhance Your Photos in 2023
10. Lack of Consistency
 One issue that always sticks out is when you have various photography styles presented on your website or online store pages, regardless of how many products you sell.
A common practice among online retailers is photographing some things against a white setting, others against a gray background, and others outdoors or another entirely contrasting background.
Your products should be presented consistently, regardless of your aesthetic and environment. This implies that if you alter your shooting technique, you must revisit and reshoot all of your earlier materials. If you don’t, they will seem exactly that way on your store pages: confusing.
To Wrap It Up
Product photography is a crucial part of the product development and marketing process. Without it, you can’t showcase your product’s features or benefits effectively.
When done right, product photography can help you connect with your audience and get their attention. It’s an investment that can translate to increased sales and satisfied customers. But if you don’t know what you’re doing, you could end up making your product look worse than it is.
Being good at what you do is one thing, but making sure that your business is being marketed right is needed to ensure its survival. Different businesses arise in online platforms such as Etsy and Shopify and ensuring that you are doing the most effective approach is key for your business to thrive. Countless competitors are out there, so you have to do everything that it takes to stand out from the crowd.
We hope this blog post has given you some insight into how to get started with product photography and make sure that your photos are helping, not hurting, your business.


Thank you for your very informative post. Starting out as a new type of business, Art, I find it very difficult to ask the right questions. Your web page is great. I look forward to doing business with you.
Blessings,
Lisa Knight